Reference no: EM133164828
Assignment: Creating the Babbage Bookkeeping Database
Problem: Babbage Bookkeeping is a local company that provides bookkeeping services to several small businesses in the area. The database consists of two tables.
1. The Client table: contains information on the businesses that use Babbage's services.
2. The Bookkeeper table: contains information on the bookkeeper assigned to the business.
Instructions: Perform the following tasks:
1. Create a new database to store all the objects related to the bookkeeping data.
2. Save this database. The database must be named with Your Last Name + First Name + Assignment6. For example, if your name is John Smith, the file must be named: SmithJohnAssignment6. 5% will be deducted for the wrong filename.
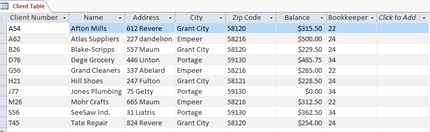
3. Create the Client table using the structure and data shown in the table below:Save the table as "Client Table."
|
ClientTable
|
|
Field Name
|
Data Type
|
Field Size
|
Primary
Key
|
Description
|
|
Client Number
|
Short Text
|
3
|
Yes
|
Client Number (Primary Key)
|
|
Client Name
|
Short Text
|
20
|
|
Name of Client
|
|
Address
|
Short Text
|
15
|
|
Street Address
|
|
City
|
Short Text
|
15
|
|
City
|
|
Zip Code
|
Short Text
|
5
|
|
Zip Code
|
|
Balance
|
Currency
|
|
|
Amount Currently Owed for Services
|
|
Bookkeeper Number
|
Short Text
|
2
|
|
Bookkeeper Number
|
4. Enter the data for the Client Table as shown in the table below:
5. Create the Bookkeeper table using the structure and data shown in the table below:Save the table as "Bookkeeper Table."
|
Bookkeeper Table
|
|
Field Name
|
Data Type
|
Field Size
|
Primary
Key
|
Description
|
|
Bookkeeper Number
|
Short Text
|
2
|
Yes
|
Bookkeeper Number (Primary Key)
|
|
Last Name
|
Short Text
|
10
|
|
Last Name of Bookkeeper
|
|
First Name
|
Short Text
|
8
|
|
First Name of Bookkeeper
|
|
Address
|
Short Text
|
15
|
|
Street Address
|
|
City
|
Short Text
|
15
|
|
City
|
|
Zip Code
|
Short Text
|
5
|
|
Zip Code
|
|
Hourly Rate
|
Currency
|
|
|
Hourly Rate
|
|
YTD Earnings
|
Currency
|
|
|
Year-to-Date Earnings
|
6. Enter the data for the Bookkeeper Table as shown in the table below:

7. Create a relationship between two tables. Specify referential integrity between the Bookkeeper table (the one table) and the Client table (the many table). Save the Relationships.
8. Create the following queries.
8.1. Create a query for the Client table. The query must display Client Number, Client Name, and Balance fields for all clients located in Empeer with a balance greater than $300.00. Save the query as "Q21-Client-Empeer Query."
8.2. Create a query to display the Client Number, Client Name, and Address fields for all clients with an address on Maum. Save the query as "Q22-Client-Maum Query."
8.3. Create a query that will allow the user to enter the city to search when the query is run. The query results should display the Client Number, Client Name, and Bookkeeper Number. Test the query by searching for those records where the client is located inPortage. Save the query as "Q23-Client-City Query."
8.4. Create a query from the Client table to display the cities in ascending order. Each city should appear only once (i.e., no repeating city). Save the query as "Q24-City-Sorting Query."
8.5. Create a query to display the Client Number, Client Name, and Balance fields for all clients where the bookkeeper number is 24 or 34 and the balance is greater than $300.00. Save the query as "Q25-Client-Bookkeeper24-34 Query."
8.6. Create a query to display the First Name, Last Name, and Hourly Rate fields from the Bookkeeper table and the Client Number, Client Name, and Balance fields from the Client table. Sort the records in ascending order by bookkeeper's last name and client's name. Save the query as "Q26-Client-Bookkeeper Query."
8.7. Create a query for the Bookkeeper table to display the Bookkeeper Number, First Name, Last Name, and Hourly Rate in the design grid. Create a new field named as "Hour Worked" in this query to calculate the number of hours each bookkeeper has worked (YTD Earnings/Hourly Rate). Display the data in this "Hour Worked" field as a standard number with 0 decimal place and also show this new created field in the Datasheet view . Save the query as "Q27-Bookkeeper-Hour Worked Query."
8.8. Create a query to display the following statistics:
a. the total balance for all clients - Save the query as "Q28a-Client Total Balance Query." Display Balance field.
b. the total balance for each bookkeeper. Save the query as "Q28b-Bookkeeper Total Balance Query." Display Bookkeeper Number and Balance fields.
c. the total balance for clients of bookkeeper 22 - Save the query as "Q28c-Client-Bookkeeper22 Balance Query." Display Bookkeeper Number and Balance fields.
8.9. Create the crosstab query as shown in the Figure below: The crosstab groups total of clients' balances by city and bookkeeper number. Save the query as "Q29-City-Bookkeeper Crosstab Query."

Assignment: Presenting Data in the Babbage Bookkeeping Database
Problem: Babbage Bookkeeping already has realized several benefits from the database you created. The company now would like you to prepare reports for the database.
Babbage Bookkeeping also needs to maintain additional data on the bookkeepers. The company wants to separate their clients into three different categories and also wants to create reports for displaying the data with grouping and summary option.
Instructions: Use the database created in the Assignment6 for this assignment. Copy the file and rename the copying file to Your Last Name + First Name + Assignment7. Perform the following tasks:
1. Open the Client table in Design view.
a. Add the field "Client Type" to the Client table.
b. The field should appear after the Zip Code field.
c. Define the data type of the field as text with a width (size) of 3.
d. This field will contain data on the type of client. The client types are MAN (Manufacturing), RET (Retail), and SER (Service). Save changes to the structure.
2. Create an update query to change all the entries in the Client Type column to RET. This will be the type of most clients. Run this query and save the query as "Q31-Update Client Type to RET Query."
3. Set the following properties to the fields in the Client table and save the changes to the table.
a. Increase the size of the Client Name field to 25.
b. Make the Client Name field a required field.
c. Specify the legal values (i.e., set the validation rule) of MAN, RET, and SER for the Client Type field. Include an appropriate validation text.
d. Set the Format property to ensure that any letters entered in the Client Number field appear as uppercase.
e. Specify that balance must be between $0.00 to $1,500.00. Include an appropriate validation text.
f. Make the Client Type field a Lookup field (i.e., a field with the drop-down value).
g. Assign a default value of RET to the Client Type field.
4. Make the following changes to the Client table. You can use either the Find button or Filter By Selection to locate the records to change:
h. Change the client type for clients G56, J77, and T45 to SER.
i. Change the client type for clients B26 and S56 to MAN.
j. Change the client name of the client S56 to SeeSaw Industries.
5. Add the following clients to the Client table:
|
Client Number
|
Client Name
|
Address
|
City
|
Zip Code
|
Client Type
|
Balance
|
Bookkeeper Number
|
|
C21
|
Crompton Meat Market
|
72 Main
|
Empeer
|
58216
|
RET
|
$0.00
|
24
|
|
L50
|
Lou's Salon
|
124 Fulton
|
GrantCity
|
58121
|
SER
|
$125.00
|
34
|
6. Resize the Client Name column to best fit the new data, and save the changes to the layout of the table. Change the font to Courier New and font size to 9. Change gridline color (not the alternate color) to blue. We learn how to do this in chapter 1 (hope you do not forget it yet)
7. Open the Client table and use Filter by Selection to find all records where the client has a balance of $0.00 AND has the Client Type of SER. Delete these records.Remove the filter.
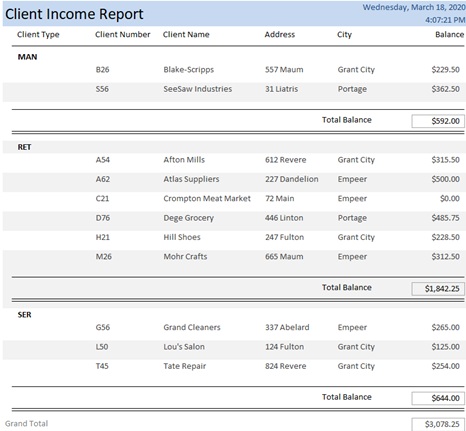
8. Create the report as shown below for the Client table. Group the report by Client type and sort the records within Client Type by Client Name. Save the report as "Client Income Report."Note that you will have to rearrange the order of the columns under the Design view after the report is created.
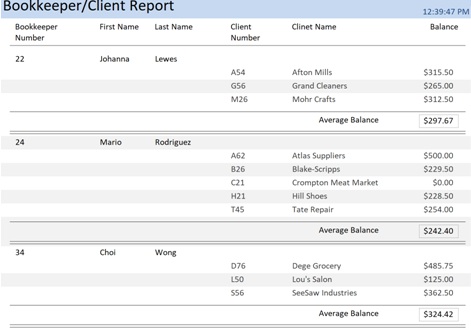
9. Create the report as shown below. Preview the report to check page margins and orientation. Adjust as necessary. Save the report as "Bookkeeper/Client Report."
Attachment:- Bookkeeping Database.rar