Protein determination
In experimental chemistry, biochemistry, biology and biotechnology, it is often vital to know the amount of protein present in a solution. For instance you may wish to determine how much enzyme to use in a reaction, or investigate how readily a drug stimulates a protein-coding gene in cells. In the biotechnical and pharmaceutical industries, accurate measurement of protein yields is a routine and vital part of the large-scale development and production of important commercial and medical products. Over several decades, quick simple methods of determining protein concentration have been devised and most are based on chromogenic molecules that provide a coloured product that can be measured quantitatively by simple spectrophotometric equipment.
One such method for determining the amount of protein in a solution is known as the Bradford reaction, and is marketed in a simple form by the company Bio-Rad. The principles of the assay are described briefly in the company's instruction booklet, which you can look at yourself on the website (www.bio-rad.com) or on Brookes Virtual where it has been loaded for you. If you want to print the whole booklet - it is 27 pages long - adjust your settings to give you 2 or 4 pages per side of paper.
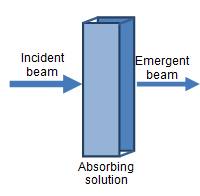
Spectrophotometers emit a calibrated beam of monochromatic light (i.e. of a single wavelength) through a test solution, and measure its reduced intensity as a result of passing through the solution. Molecules within the test solution absorb (and to a small extent scatter) the light, causing the emergent beam to have a lower intensity compared to the incident beam. The difference in intensity can be expressed as transmittance or, more usually, absorbance, and is proportionate to the amount of light-absorbing molecules in the solution.
Planning - standard curves(see box on page 10)
The Bio-Rad assay provides data in the form of absorbance readings (A595nm) detected using a spectrophotometer. To determine the protein concentration of a solution from such data you need to be able to reliably and accurately convert the experimental data into useful information (in this case, mg protein mL-1).
This is simple enough to achieve by testing a set of carefully made standard solutions, each of a known protein concentration across a given range. When tested with the same assay, the standards will provide a set of absorbance readings that can each be plotted against an actual protein concentration. If you've chosen your standards carefully (and made them accurately), then you will find that some part of the curve is linear, where increasing protein concentration is directly correlated to increasing absorbance.
NOTE: at lower protein concentrations the curve is unreliable because the assay is not sensitive enough, whilst at higher concentrations the reagents in the tube become saturated and increasing protein content remains undetected. It's therefore important that only the linear part of the curve is used for determining the concentration of unknown samples, as it's only in this region that the absorbance results are directly proportional to the amount of protein present.
But how do you know that your sample, when tested, will give an absorbance reading that lies within this linear region of the graph? The answer to this problem is very simple - you need to test your sample in both an undiluted and a diluted form, and it is likely that at least one of your readings will fall in the linear range of your standard curve. Of course if it's a diluted sample, you'll need to know the dilution factor, and accommodate it in your final determination of protein concentration.
Experimental
The Bio-Rad dye reagent has been prepared for you and is ready to use. You will be given a solution of bovine serum albumin (BSA) at 5 mg mL-1, to make your standard solutions from. Make your standards and dilute your test samples in small plastic microfuge tubes. Use the glass test tubes for your actual BioRad tests.
1. Prepare a range of standards, each containing a known protein concentration
- Using the BSA protein solution and deionised water carefully make nine standard solutions (make 0.5 mL volumes of each) at the concentrations indicated below. Be sure to pipette all volumes accurately, and to mix each standard carefully and thoroughly.
0.05 mg mL-1 0.5 mg mL-1 1.2 mg mL-1
0.10 mg mL-1 0.75 mg mL-1 1.5 mg mL-1
0.25 mg mL-1 1.0 mg mL-1 2.0 mg mL-1
2. Prepare TWO dilutions of your test protein sample
- Using deionised water, make a 2-fold and a 5-fold dilution of the test protein solution (make 0.5 mL volumes of each). Be sure you pipette all volumes accurately, and that you mix each dilution carefully and thoroughly.
3. Mix each sample with Bio-Rad reagent at defined, identical time intervals
- Pipette 100 ml of deionised water into the bottom of a clean test tube - this will be your negative control (i.e. it contains no protein).
- Pipette 100 ml of each standard solution into a separate clean, labelled test tube. Arrange your tubes in order - you'll want to work from the lowest to the highest concentration.
- Pipette 100 ml of your diluted and your undiluted test protein solutions each into a clean, labelled test tube. Again, arrange them so that you work methodically, starting with the most dilute and ending with the undiluted sample.
- Add 5 mL of the Bio-Rad reagent to the negative control tube. Mix thoroughly and note the time.
- Wait 2 minutes (TIME THIS) and add 5 mL of Bio-Rad reagent to the standard tube containing the lowest protein concentration. Mix thoroughly and note the time.
- Carry on in this way, waiting 2 minutes between each addition, until you have added reagent to all of the test tubes containing standard solutions.
- Proceed with the test protein samples - add 5 mL of Bio-Rad reagent to the tube containing the highest (5-fold) dilution. Mix thoroughly, note the time and proceed in the same way with the 2-fold dilution, finally adding reagent to your undiluted sample.
4. Measure the absorbance of each sample at defined, identical time intervals
- Your spectrophotometers have been pre-set for you at a wavelength of 595nm. Have ready a plastic cuvette and some tissue paper. Be sure you know which way the cuvette goes into the spectrophotometer.
- Pour sufficient reaction solution from the negative control tube into the cuvette to fill it to within a few mm from the top. Place the cuvette correctly into the spectrophotometer, close the lid and use the "blank" or "autozero" button (press it once only) to establish a baseline reading. This will show as 0.000 in the centre or top right of the screen.
- Take the cuvette out of the spectrophotometer, pour away the contents and blot onto the paper towel to eliminate most of the liquid - do not rinse the cuvette.
- From this point onwards, you want to take readings at 2 minute intervals, so that all tubes have been incubating with reagent for the same length of time.
- Using the same cuvette, pour sufficient reaction solution from the standard tube containing the lowest protein concentration to fill the cuvette, return it (correctly) to the spectrophotometer and close the lid. Don't press any buttons - the absorbance of the reaction will be displayed on the screen, for you to record.
- Repeat, using the same cuvette, for all standard solutions (at 2 minute intervals), recording the absorbance reading each time.
- Use a new cuvette to repeat the process for measuring absorbance of your test protein samples, again starting with the most dilute sample and ending with the undiluted sample.
Recording
As always, record your procedures, observations and results directly into your lab notebook. Make sure you have all the relevant measurements and volumes that you need for each standard and sample you have made, and the absorbance reading for each one tested. Whilst there are technically units for absorbance, in general they are not used as they are rather cumbersome, but it always important to display the wavelength being used.