Explain the Ray Diagrams for Mirrors?
To figure out the position and size of an image reflected by a curved mirror, you can draw a scaled diagram of the mirror as follows: along the principle axis are the center of the radius of curvature of the mirror, C, and the focal point of the mirror, F, which is half-way between C and the mirror. The following diagram is for an object at a distance greater than 2r from a concave mirror.
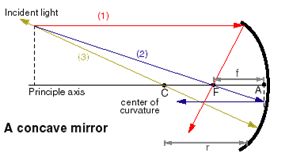
Once you draw in the object, it is easy to draw three light rays in any ray diagram, as our diagram of a concave mirror shows:
#1: a light ray parallel to the axis from the top of the object will reflect and be drawn from the surface of the mirror back through the focus, F.
#2: a light ray drawn from the top of the object through F reflects off the mirror and can be drawn parallel to the principal axis.
#3: a light ray can be drawn from the top of the object through the point C and the reflected ray will fall back along the same path.
The image is where these three rays intersect. In this case, the image is smaller, inverted and situated between F and C, closer to F. If the drawing is done carefully to scale, the exact distance and height of the image can be measured from the diagram
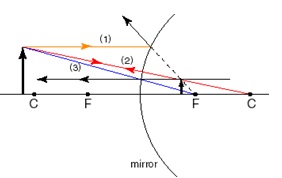
In the case of a convex mirror, the points C and F are behind the mirror and the three rays are drawn as follows:
#1: Begin with a ray drawn from the top of the object to the mirror parallel to the central axis. If you drew a line (shown as a dotted line on our diagram) from point F through the point at which the ray hits the mirror, then the ray would be reflected back along the extension of the line.
#2: Draw a light ray from the top of the object through the point C behind the mirror, and the reflected ray will fall back along the same path.
#3: Draw a light ray drawn from the top of the object to the point F behind the mirror. The reflection is drawn parallel to the principal axis from where the incident ray intersects the mirror surface. It is useful to extend this reflected ray behind the mirror.
Where the three extended reflected rays intersect, there is the virtual image. The virtual image is an image that cannot be seen on a screen placed at this position, because the light only seems to be coming from behind the mirror, but does not actually go behind the mirror. In this case, the image is erect, smaller than the object and situated between F and the mirror, closer to F. If the drawing is done carefully to scale, the exact distances and heights of the image can be measured from the diagram.
The lens equation can be used for mirrors with a positive focal length for concave spherical mirrors and a negative focal length for convex spherical mirrors. (See the end of the Ray Diagrams lesson for the section on Thin Lenses.) All other sign conventions are the same as described for lenses.
A plane mirror is a perfectly flat mirror. The image can be determined with a ray diagram. The object is represented by the thick black arrow.
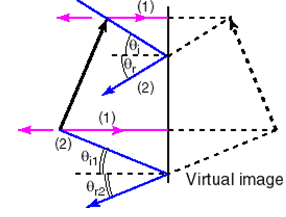
Two rays can be drawn from the top and the bottom of the arrow. The incident rays can be at 90o to the mirror and be reflected back on the same path (1). Alternatively, for rays that are not perpendicular, you can use the angle of incidence to figure the angle of reflection, because the angle of reflection relative to normal is equal to the angle of incidence (2). If you then extend the reflected rays along the angle of reflection back behind the plane mirror, the point where the two rays from the top of the object (1) intersect with the extended line of the angle of reflection (dotted line 2) is at a distance behind the mirror equal to the distance from the top of the object to the front of the mirror. The two rays reflected from the bottom of the object intersect at a distance behind the mirror equal to the distance from the bottom of the object to the front of the mirror. So, the image (represented by the dotted arrow) is the same size as the object. It is an erect, virtual image as far behind the mirror as the object is in front of the mirror. The image is laterally reversed.